Taming the herd: using Zookeeper and Exhibitor on Google Container Engine
Vic Iglesias
Senior Product Manager
Zookeeper is the cornerstone of many distributed systems, maintaining configuration information, naming and providing distributed synchronization and group services. But using Zookeeper in a dynamic cloud environment can be challenging, because of the way it keeps track of members in the cluster. Luckily, there’s an open source package called Exhibitor that makes it simple to use Zookeeper with Google Container Engine.
With Zookeeper, it’s easy to implement the primitives for coordinating hosts, such as locking and leader election. To provide these features in a highly available manner, Zookeeper uses a clustering mechanism that requires a majority of the cluster members to acknowledge a change before the cluster’s state is committed. In a cloud environment, however, Zookeeper machines come and go from the cluster (or “ensemble” in Zookeeper terms), changing names and IP addresses, and losing state about the ensemble. These sorts of ephemeral cloud instances are not well suited to Zookeeper, which requires all hosts to know the addresses or hostnames of the other hosts in the ensemble.
Netflix tackled this issue, and in order to more easily configure, operate, and debug Zookeeper in cloud environments, created Exhibitor, a supervisor process that coordinates the configuration and execution of Zookeeper processes across many hosts. Exhibitor also provides the following features for Zookeeper operators and users:
- Backup and restore
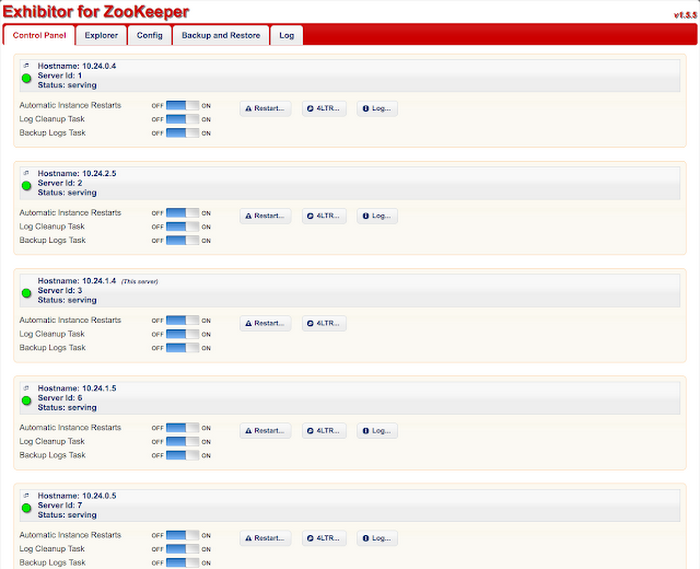
- A lightweight GUI for Zookeeper nodes
- A REST API for getting the state of the Zookeeper ensemble
- Rolling updates of configuration changes
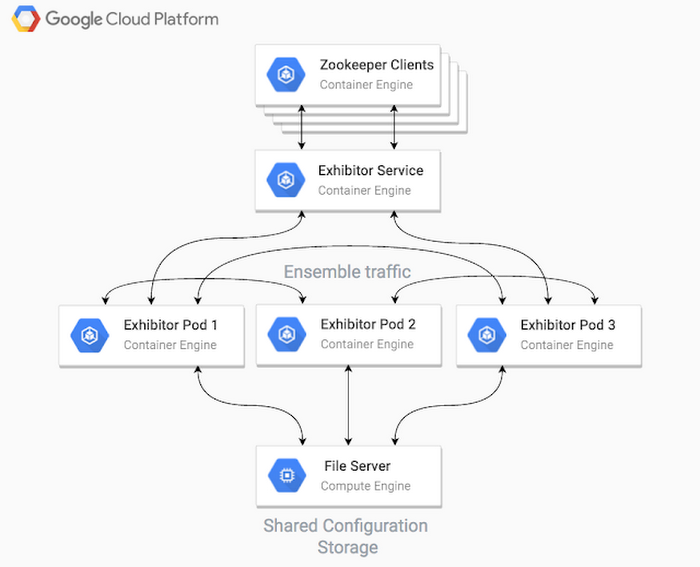
To start, provision a shared file server to host the shared configuration file between your cluster hosts. The easiest way to get a file server up and running in Google Cloud Platform is to create a Single Node File Server using Google Cloud Launcher. For horizontally scalable and highly available shared filesystem options on Cloud Platform, have a look at Red Hat Gluster Storage and Avere. The resulting file server will expose both NFS and SMB file shares.
- Provision your file server
- Select the Cloud Platform project in which you’d like to launch it
- Choose the following parameters for the dimensions of your file server
- Zone — must match the zone of your Container Engine cluster (to be provisioned later)
- Machine type — for this tutorial we chose a n1-standard-1 as throughput will not be very high for our hosted files
- Storage disk size — for this tutorial, we chose a 100GB disk as we will not need high throughput nor IOPS
- Click Deploy
- Create a new Kubernetes cluster using Google Container Engine
- Ensure that the zone setting is the same as you use to deploy your file server (for the purposes of this tutorial, leave the defaults for the other settings)
- Click Create
clicking the button in the top right of the interface. It looks like:

Now set up your Zookeeper ensemble in Kubernetes.
- Set the default zone for the gcloud CLI to the zone you created for your file server and Kubernetes cluster:
- Download your Kubernetes credentials via the Cloud SDK:
- Create a file named exhibitor.yaml with the following content. This will define our Exhibitor deployment as well as the service that other applications can use to communicate with it:
- Create the artifacts in that manifest with the kubectl CLI
Monitor the pods until they all enter the RUNNING state
- Run the kubectl proxy command so that you can access the Exhibitor REST API for the Zookeeper state:
- After a few minutes, the cluster state will have settled and elected a stable leader.
In order to access the Exhibitor web UI, run the kubectl proxy command on a machine with a browser, then visit this page.
To scale up your cluster size, simply edit the exhibitor.yaml file and change the replicas to an odd number greater than 3 (e.g., 5), then run “kubectl apply -f exhibitor.yaml” again. Cause havoc in the cluster by killing pods and nodes in order to see how it responds to failures.