Getting started with Cloud Tools for Visual Studio
Mete Atamel
Developer Advocate
If you're a .NET developer, you're used to managing cloud resources right inside Visual Studio. With the recent release of our Cloud Tools for Visual Studio, you can also manage your Google Cloud Platform resources from Visual Studio.
Cloud Tools is a Visual Studio extension. It has a quickstart page with detailed information on how to install the extension, how to add your credentials and how to browse and manage your cloud resources. In this post, I want to highlight some of the main features and refer to individual how-to pages for details.
Installation
You can install the extension in two ways: From inside Visual Studio, you can either go to “Tools” and then “Extension and Updates,” or you can install it from Visual Studio Gallery. The installation section of quickstart page has the installation details.Authentication
Once installed, you can find “Google Cloud Tools” under “Tools.” “Google Cloud Explorer” is the main tool to browse and manage cloud resources, but before you can use it, you need to add your credentials to Visual Studio.To add your credentials, select “Manage Accounts.” This opens a new browser window, where you log into your cloud account and add your credentials to Visual Studio.
Google Cloud Explorer
Google Cloud Explorer is a browser for Google Cloud Resources. Once you’ve selected your project from the top dropdown, it displays three different types of cloud resources: Google Compute Engine, Google Cloud Storage, and Google Cloud SQL.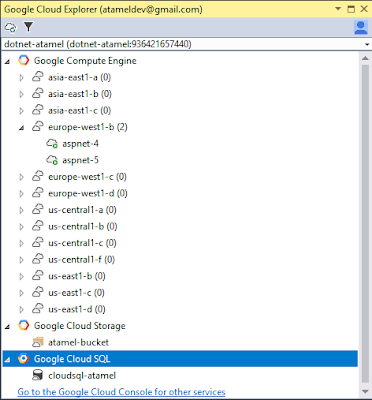
In the Compute Engine list, you can see all your Windows and Linux instances. If you right-click on the instances, you can perform administrative tasks such as opening terminal sessions or resetting Windows usernames and passwords. You can also create an ASP.NET instance (a Windows instance with the ASP.NET stack installed) by right-clicking on the Compute Engine list item. It directs you to Google Cloud Launcher to install the instance, into which you can then deploy your ASP.NET app.
In the Cloud Storage list, you can see all the Cloud Storage buckets you have in your project and navigate to Google Cloud Console to browse the contents of the bucket. Browsing Storage Buckets documentation has more details.
The Cloud SQL list shows all your Cloud SQL instances, and you can easily create data connections to those instances as explained in Browsing Cloud SQL Instances documentation.
Hopefully, this gave you a high level overview of the Cloud Tools for Visual Studio.
Give it a try and let us know in the comments what you think. Any issues? Report them here, or visit our GitHub page if you want to contribute.
"Interested in helping us improve the Google Cloud User Experience? Click here!"