Creating a single pane of glass for your multi-cloud Kubernetes workloads with Cloudflare
Kamilla Amirova
Solutions Engineer, Special Projects, Cloudflare
[Editor’s note: As much as we’d love to host all your workloads on Google Cloud Platform (GCP), sometimes it’s not in the cards. Today we hear from Cloudflare about how to enable a multi-cloud configuration using its load balancer to front Kubernetes-based workloads in both Google Kubernetes Engine and Amazon Web Services (AWS).]
One of the great things about container technology is that it delivers the same experience and functionality across different platforms. This frees you as a developer from having to rewrite or update your application to deploy it on a new cloud provider—or lets you run it across multiple cloud providers. With a containerized application running on multiple clouds, you can avoid lock-in, run your application on the cloud for which it’s best suited, and lower your overall costs.
If you’re using Kubernetes, you probably manage traffic to clusters and services across multiple nodes using internal load-balancing services, which is the most common and practical approach. But if you’re running an application on multiple clouds, it can be hard to distribute traffic intelligently among them. In this blog post, we show you how to use Cloudflare Load Balancer in conjunction with Kubernetes so you can start to achieve the benefits of a multi-cloud configuration.
The load balancers offered by most cloud vendors are often tailored to a particular cloud infrastructure. Load balancers themselves can also be single points of failure. Cloudflare’s Global Anycast Network comprises 120 data centers worldwide and offer all Cloudflare functions, including Load Balancing, to deliver speed and high availability regardless of which clouds your origin servers are hosted on. Users are directed to the closest and most suitable data center to the user, maximizing availability and minimizing latency. Should there be any issue connecting to a given datacenter, user traffic is automatically rerouted to the next best available option. It also health-checks your origins, notifying you via email if one of them is down, while automatic failover capabilities keep your services available to the outside world.
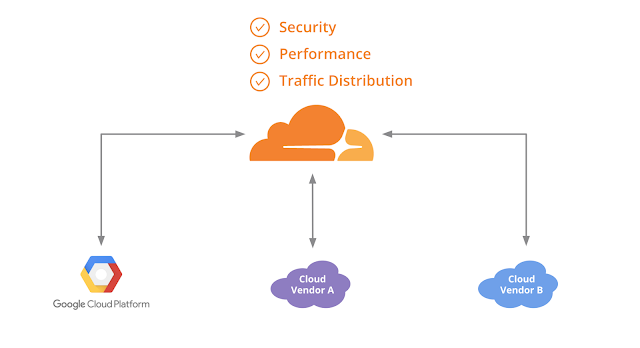
By running containerized applications across multiple clouds, you can be platform-agnostic and resilient to major outages. Cloudflare represents a single pane of glass to:
- Apply and monitor security policies (DDoS mitigation, WAF, etc.)
- Manage routing across multiple regions or cloud vendors, using our Load Balancer
- Tweak performance settings from a single location. This reduces the time you spend managing configurations as well as the possibility of a misconfiguration
- Add and modify additional web applications as you migrate services from on-premise to cloud or between different cloud providers
Load balancing across AWS and GCP with Cloudflare
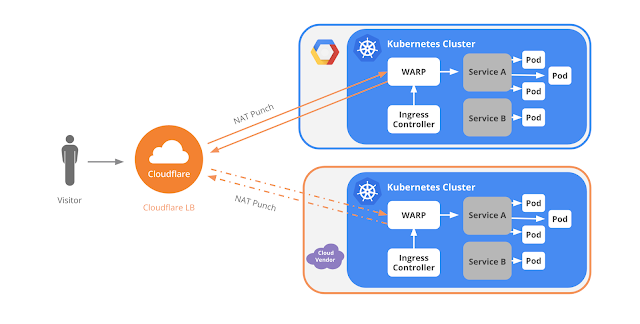
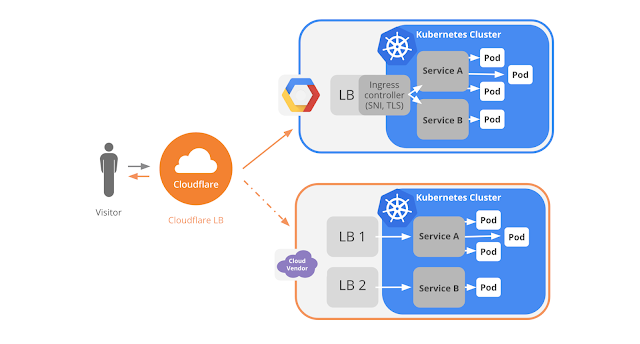
To give you a better sense of how to do this, we created a guide on how to deploy an application using Kubernetes on GCP and AWS along with our Cloudflare Load Balancer.The following diagram shows how the Cloudflare Load Balancer distributes traffic between Google Cloud and another cloud vendor for an application deployed on Kubernetes. In this example, the GCP origin server uses an ingress controller and an HTTP load balancer, while another cloud vendor origin its uses own load balancer. The key takeaway is that Cloudflare Load Balancer works with any of these origin configurations.
Here's an overview of how to set up a load-balanced application across multiple clouds with Cloudflare.
Step 1: Create a container cluster
GCP provides built-in support for running Kubernetes containers with Google Kubernetes Engine. You can access it with Google Cloud Shell, which is preinstalled with gcloud, docker and kubectl command-line tools. Running the following command creates a three-node cluster:Now you have a pool of Compute Engine VM instances running Kubernetes.

AWS
AWS recently announced support for the Kubernetes container orchestration system on top of its Elastic Container Service (ECS). Click Amazon EKS to sign up for the preview.Until EKS is available, here’s how to create a Kubernetes cluster on AWS:
- Install the following tools on your local machine: Docker, AWS CLI with an AWS account, Kubectl and Kops (a tool provided by Kubernetes that simplifies the creation of the cluster)
- Have a domain name, e.g. mydomain.com
- In the AWS console have a policy for your user to access the AWS Elastic Container Registry
- An S3 bucket to store information about the created cluster and its configuration
- A Route53 domain (hosted zone) on which to run the container, e.g., k8s.mydomain.com. Kops uses DNS for discovery, both inside the cluster and so that you can reach the Kubernetes API server from clients
Then, run the following command to create the cluster in AWS:
Kops then creates one master node and two slaves. This is the default config for Kops.

Step 2: Deploy the application
This step is the same across both Kubernetes Engine and AWS. After you create a cluster, use kubectl to deploy applications to the cluster. You can usually deploy them from a docker image.This creates a pod that is scheduled to one of the slave nodes.
Step 3 - Expose your application to the internet
On AWS, exposing an application to traffic from the internet automatically assigns an external IP address to the service and creates an AWS Elastic Load Balancer.On GCP, however, containers that run on Kubernetes Engine are not accessible from the internet by default, because they do not have external IP addresses by default. With Kubernetes Engine, you must expose the application as a service internally and create an ingress resource with the ingress controller, which creates an HTTP(S) load balancer.
To expose the application as a service internally, run the following command:
In order to create an ingress resource so that your HTTP(S) web server application is publicly accessible, you'll need to create the yaml configuration file. This file defines an ingress resource that directs traffic to the service.
Once you’ve deployed the ingress resource, the ingress controller that's running in your cluster creates an HTTP(S) Load Balancer to route all external HTTP traffic to the service.
Step 4 - Scale up your application
Adding additional replicas (pods) is the same for both Kubernetes Engine and AWS. This step ensures there are identical instances running the application.
The Load Balancer that was provisioned in the previous step now starts routing traffic to these new replicas automatically.
Setting up Cloudflare Load Balancer
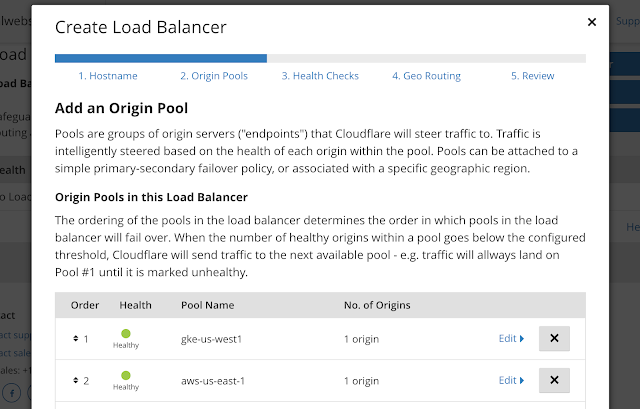
Now, you’re ready to set up Cloudflare Load Balancer, a very straightforward process:- Create a hostname for Load Balancer, for example lb.mydomain.com
- Create Origin Pools, for example, a first pool for GCP, and a second pool for AWS
- Create Health Checks
- Set up Geo Routing, for example all North America East traffic routes to AWS instance, etc.
Please see our documentation for detailed instructions how to set up the Cloudflare Load Balancer.
Introducing Cloudflare Warp
Working with StackPointCloud we also developed a Cloudflare WARP Ingress Controller, which makes it very easy to launch Kubernetes across multiple cloud vendors and uses Cloudflare controller to tie them together. Within StackPointCloud, adding the Cloudflare Warp Ingress Controller requires just a single click. One more click and you've deployed a Kubernetes cluster. Behind the scenes, it implements an ingress controller using a Cloudflare Warp tunnel to connect a Cloudflare-managed URL to a Kubernetes service. The Warp controller manages ingress tunnels in a single namespace of the cluster. Multiple controllers can exist in different namespaces, with different credentials for each namespace.